Adding an Image to an Annotation
Description
Customizing your task draw with images is possible by inserting them into annotations. It is recommended to use vector graphics such as .svg files. Follow these steps to add an image to an annotation:
- Double-click on the drawing canvas.
- Select the path to your desired image.
- Deselect the autosize option.
Keywords
annotation; image
Adjusting Size and Customizing an Annotation
Description
Annotations are valuable tools for providing clarification and making graphical modifications to the task drawing. To resize and customize an annotation, follow these steps:
- Double-click on the drawing canvas.
- Enter the desired text for the annotation and customize its color and other parameters as desired.
- If needed, resize the annotation to cover a larger area of the drawing.
Keywords
annotation; customizing

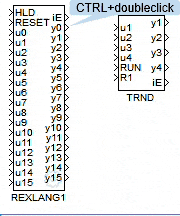
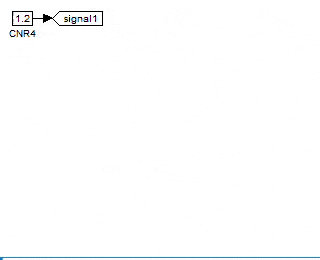
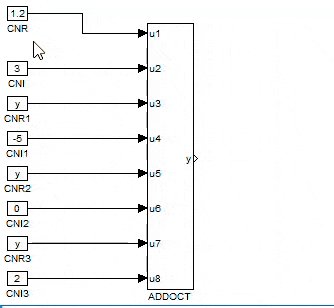
Automatic Block Connection
Description
When dealing with a large number of inputs, there is a convenient way to automatically connect them. This method is especially useful for connecting blocks with numerous inputs or outputs. The procedure is simple:
- Select the blocks with outputs.
- Press the Ctrl key and click on the block with inputs.
The automatic connection of outputs and inputs relies on the spatial arrangement of the blocks and their I/O order.
Keywords
block connection; line; Ctrl key
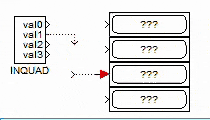
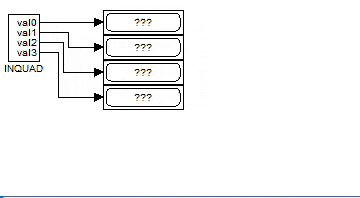
Automatic Block Connections with Specific Input
Description
In scenarios where specific inputs need to be prioritized, this method allows for targeted connections. Here's how it's done:
- Select the blocks with outputs.
- Hold the Ctrl key and click precisely on the desired initial input for connection.
This approach to connecting blocks automatically also relies on the physical layout of the blocks and the order of their inputs/outputs.
Keywords
block connection; line; Ctrl key
Automatic Block Connections from Specific Output
Description
This approach is tailored for situations where particular outputs require priority in connections. The process is detailed below:
- While pressing the Ctrl key, double-click accurately on the output you want to connect.
- A new line will be generated and focused.
- Press the Ctrl key once more and click accurately on the input you want to connect to.
Keywords
block connection; line; Ctrl key
Autosize flags
Description
The sizes of From and Goto flags can be easily adjusted based on their content. Select the flags that need their sizes adapted, right-click on them, and from the context menu, choose the option Autosize flags.
Keywords
autosize; flags; context menu
Autosize flags
Description
The sizes of From and Goto flags can be easily adjusted based on their content. Select the flags that need their sizes adapted, right-click on them, and from the context menu, choose the option Autosize flags.
Keywords
autosize; flags; context menu

Blocks Connection
Description
To create connections between blocks, you have two options: dragging and dropping a line from the output to the input, or utilizing mouse clicks. The latter method is showcased in the accompanying gif. Follow these steps:
- Select the output block.
- Press the Ctrl key and click on the input block.
This action will create a connection. You can apply the same process to connect previously unconnected lines with blocks or another unconnected lines.
Keywords
blocks connection; line; Ctrl key
Block and Line Alignment
Description
The studio offers convenient tools for aligning blocks and distributing them evenly. Moreover, you have the option to ensure that lines between blocks are perpendicular, which can be useful when resizing blocks. All these tools are easily accessible in the Block Alignment and Distribution Toolbar.
Keywords
block position; adjustment; line perpendicularity
Disconnecting a Line
Description
If you need to break a line, you can easily do so by following these steps:
- Right-click on the specific line.
- Choose "Break / Disconnect Line" from the context menu.
Keywords
line; disconnect; break
Disconnecting a Line
Description
If you need to break a line, you can easily do so by following these steps:
- Right-click on the specific line.
- Choose "Break / Disconnect Line" from the context menu.
Keywords
line; disconnect; break
Converting Between From and Goto Flags
Description
In the Studio, you have the flexibility to convert Goto flags to From flags and vice versa seamlessly. This allows you to create complementary flags quickly using the following steps:
- Copy the original flag.
- Right-click on the new flag.
- Choose "Convert to 'From/Goto' flag" from the context menu.
Keywords
flags; conversion; From; Goto; context menu
Navigating Through Flags
Description
Finding the destination of a From/Goto flag can sometimes be challenging. To help with this, the studio provides a search function. Here's how to use it:
- Right-click on the specific flag.
- Select "Navigate to ..." from the context menu. A list of relevant flags will appear.
- Click on an item in the list, and the corresponding flag will be highlighted.
The same function is also available for the Inport and Outport blocks when establishing connections between various tasks.
Keywords
flags; navigation; From; Goto; Inport; Outport; context menu

Replace the Wire with Flags
Description
In complex diagrams, it is sometimes useful to replace block connections with flags (virtual lines). In the software, you can perform this replacement by right-clicking on the line and selecting the option Replace line with From/Goto flags from the context menu. Following that, you can assign a unique name to the flags for better identification and organization.
Keywords
blocks connection; flags; context menu
Utilizing the Configure Icon
Description
Certain blocks, such as drivers, HMI, or REXLANG, feature a gear icon located in their lower right corner. This icon indicates that these blocks offer additional configuration options, which were previously accessible only through "Block properties". Now, you can access the configuration directly from the drawing by clicking on this gear icon.
Blocks of the task or subsystem type also have a similar icon, but it opens the corresponding schema instead of the "Block properties".
Keywords
configure icon; blocks
Customizing Tab Layout
Description
For users who prefer a different tab layout, the studio allows easy customization based on individual preferences. Follow these simple steps:
- From the Menu, go to View and select the desired view.
- Drag the card to the newly designated location using the mouse.
- Adjust the size of the tabs to accommodate the displayed content.
Keywords
menu; tab layout; customization