Getting Started with REXYGEN
User guide
2025-03-27
Plzeň (Pilsen), Czech Republic
Contents
1.1 Features of the REXYGEN system
1.1.1 Supported platforms
1.2 Structure of the REXYGEN system
1.3 Programming in the REXYGEN system
1.4 Main components of the REXYGEN system
1.4.1 REXYGEN Studio – the development environment
1.4.2 REXYGEN HMI Designer
1.4.3 REXYGEN Compiler
1.4.4 RexCore
2 Installation of REXYGEN development tools
2.1 Windows 10/11
2.2 GNU/Linux
3 Default REXYGEN Project
3.1 Loading project from the platform to REXYGEN Studio
3.2 Control the platform from HMI
3.3 Control the platform through OPC UA
Chapter 1
Introduction
This document is the first in a series designed to guide you through the basics of the REXYGEN system. It is tailored for users who are new to REXYGEN. By completing all documents in the Getting Started and Tutorials series, you will learn how to install the development studio, set up and license REXYGEN on your device, and create a basic project, including visualization. Should you have any questions, encounter a problem, or discover a bug, please feel free to reach out via our forum at https://forum.rexygen.com or contact our support team at mailto:support@rexcontrols.com .
The REXYGEN system is a family of software products for automation projects. You can use it in all fields of automation, robotics, measurements and feedback control.
The runtime core of the REXYGEN system turns your platform into a programmable device which will run your algorithms.
1.1 Features of the REXYGEN system
- Graphical programming without hand-coding
- Programming control units on a standard PC or laptop
- User interface for desktop, tablet and smartphone (HMI)
- Wide family of supported devices and input-output units
- Industry-proven control algorithms
- Easy integration into business IT infrastructure (ERP/BMS)
- REST API for seamless integration into Industry 4.0 and (I)IoT solutions
1.1.1 Supported platforms
The REXYGEN system is currently supported and tested on the following platforms:
- Industrial PC with Windows or Linux (including RT_PREEMPT)
- Weidmüller u-OS PLC (WL2000, M3000, M4000)
- Unipi PLC (Iris, Patron, Neuron)
- Raspberry Pi
- Monarco HAT
However, the REXYGEN system can be operated on any device running the Linux operating system. Guides are also available for older platforms such as WAGO PFC100/200, Unipi v1.1, and Pigeon PLC. However, these platforms are no longer actively tested.
1.2 Structure of the REXYGEN system
The REXYGEN-based control system consists of the following components:
- Development Environment – REXYGEN Studio
- Control System Device (Platform) – The target computer or PLC on which the REXYGEN runtime will run
- Runtime Environment Installation on Hardware – RexCore (REXYGEN runtime core)
- Sensors and Actuators – Physical devices communicating with REXYGEN using drivers
- Additional services – HMI, data collection to database or cloud, etc.
1.3 Programming in the REXYGEN system
The REXYGEN system provides a graphical development environment for programming algorithms. You can develop using a standard PC, but in some cases, directly on the target device. Algorithms are created from so-called function blocks. The library of function blocks includes a wide array of items, including timers, comparators, filters, PID controllers, and much more.
1.4 Main components of the REXYGEN system
1.4.1 REXYGEN Studio – the development environment
REXYGEN Studio is a development tool compatible with Windows and Linux operating systems. Algorithms are created using the function block library (IEC 61131-3 standard defines Function Block Diagram (FBD) as one of the PLC programming methods.) of the REXYGEN system [1]. This library includes simple comparators and timers, as well as advanced blocks for signal processing and feedback control (such as PID controllers). You compile the project on a development device, then download and run it on the target platform.
Once the algorithm is running, it can be monitored in real-time. Simply select the signals and function blocks that interest you. You can also obtain detailed hierarchical information about the running algorithm and perform diagnostics on the runtime core and the operation of the algorithm itself. Connection can be established via a local network or the internet.
1.4.2 REXYGEN HMI Designer
The REXYGEN HMI Designer is another developer’s tool intended for designing graphical user interface (or HMI, Human Machine Interface, if you prefer) for your algorithms. The user interface is included in the project and it is copied to your platform along with the algorithm.
1.4.3 REXYGEN Compiler
The REXYGEN Compiler converts your algorithms into binary code of the REXYGEN system. The compiler is almost invisible for the user, it is invoked from the REXYGEN Studio development environment. The compiler detects and reports possible errors in your algorithms.
1.4.4 RexCore
The RexCore (REXYGEN runtime core) service runs on the target device (platform). Once installed, it runs in the background and therefore it is almost invisible for the user. It handles timing and execution of your algorithms and provides various services. The individual tasks are prioritized and executed using preemptive multitasking. The RexCore service is automatically started at system startup.
RexCore further contains an integrated webserver providing user interface (HMI) and REST API. The installation procedure on the target device is described in a separate document [2]. After installation, the licence must be activated, which is described in [3].
Chapter 2
Installation of REXYGEN development tools
This chapter describes the process of installing REXYGEN development tools on computers with Windows 10/11 operating systems. The tools REXYGEN Studio and REXYGEN Compiler can also be installed on systems with the Linux operating system.
2.1 Windows 10/11
REXYGEN development tools for Windows are available in two installation packages. The first package contains REXYGEN Studio, REXYGEN Compiler and the RexCore module for the Windows platform. The installation file is called REXYGEN Windows Installer, and the version of REXYGEN is specified in the file name REXYGEN-X.XX.XX.XXXX.exe, where X.XX.XX.XXXX represents the version of REXYGEN. The second installation file includes REXYGEN HMI Designer.
Both installation packages can be downloaded from https://www.rexygen.com/software-download . Administrator rights are required for installation. After launching the installation file, an installation wizard will appear. Follow the instructions provided by the wizard. It is recommended to keep the default installation path and choose a full installation. Restarting the computer is not necessary after installation.
2.2 GNU/Linux
The REXYGEN Studio and REXYGEN Compiler tools can also be installed and used on the Linux operating system. The installation is carried out using a separate package and is described along with the installation of RexCore on the target device in a separate document [2].
Chapter 3
Default REXYGEN Project
To facilitate a quick start with the REXYGEN system and your platform, we have prepared example projects for various platforms. These projects are stored in the example library, which is part of the REXYGEN Studio installation. You can browse the library using REXYGEN Studio, as mentioned in the introduction [4]. The examples demonstrating the use of the REXYGEN system on individual platforms are organized in a hierarchical structure, with each group of examples located in the folder 01xx_<platform name>. Typically, the folder contains an example named IO_Flags, which demonstrates the inputs and outputs of the platform, and a basic example named Getting_Started.
If you are using a platform with our pre-installed REXYGEN system image (installation is described in [2]), the default project is already loaded on your device and ready to use. This project serves as a basic validation of the installation correctness and as a starting point for more complex applications. It allows for the control of digital outputs (DO), analog outputs (AO), monitoring the status of digital inputs (DI), and analog inputs (AI). The project includes only the basic inputs and outputs present on all models of the platform. The process of creating and developing a new project from scratch is detailed in [5] and [6].
IMPORTANT: The default project automatically starts upon device boot if you have a valid permanent license on it. If you only have a demo license, you must first open the project using the procedure described in section 3.1, or from the example library in REXYGEN Studio, compile it, and download it to the platform. The latest examples are available with the latest installation of the development tools or at https://www.rexygen.com/example-projects/ . The process of compiling and launching the project is described in [5].
3.1 Loading project from the platform to REXYGEN Studio
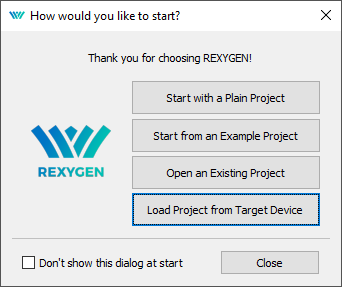
After installation of REXYGEN development tools (described in Chapter 2), you can open the REXYGEN Studio on your PC and download algorithm of this default project from your platform.
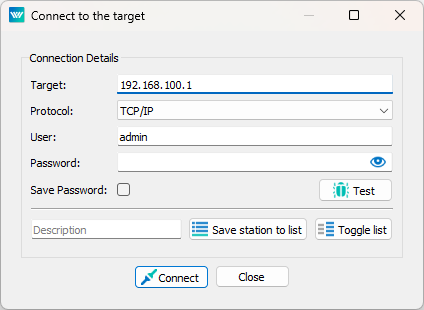
Select Load Project from Target Device from starting dialog or from File Open Project from Target Device and connect to your platform (replace 192.168.1.100 with the IP address of your platform).
Select (or create) the directory where the project will be saved on your PC.
If everything went well, the project algorithm will appear (on the image bellow is an example of Unipi Patron project).
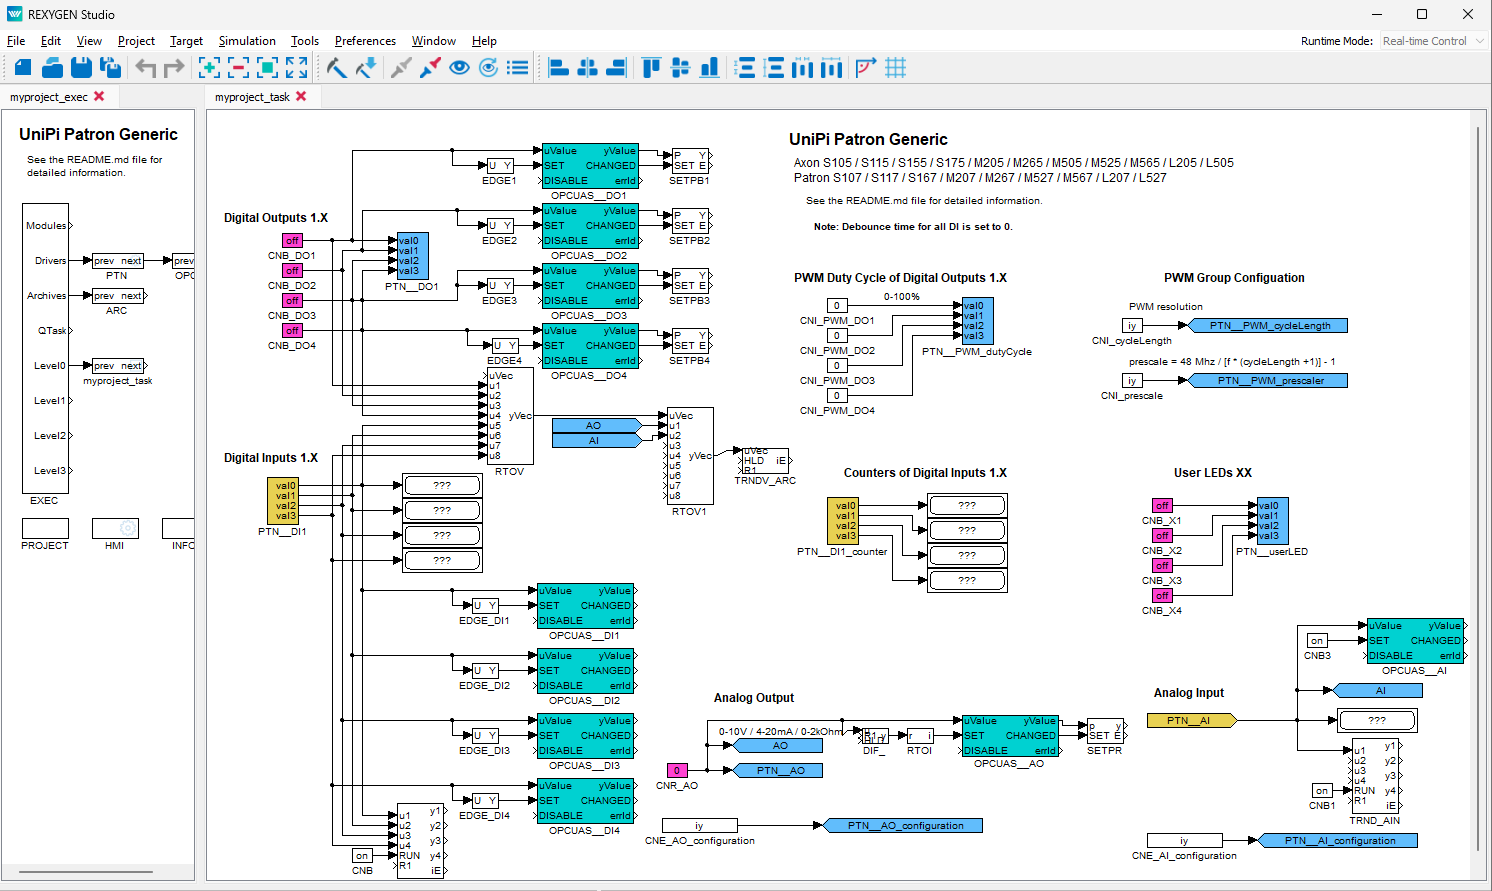
IMPORTANT: If you are about to compile the project and upload it back to the target device and you only have a DEMO license, make sure that the SourcesOnTarget option is not selected in the PROJECT block. This option is only available to users with a permanent license.
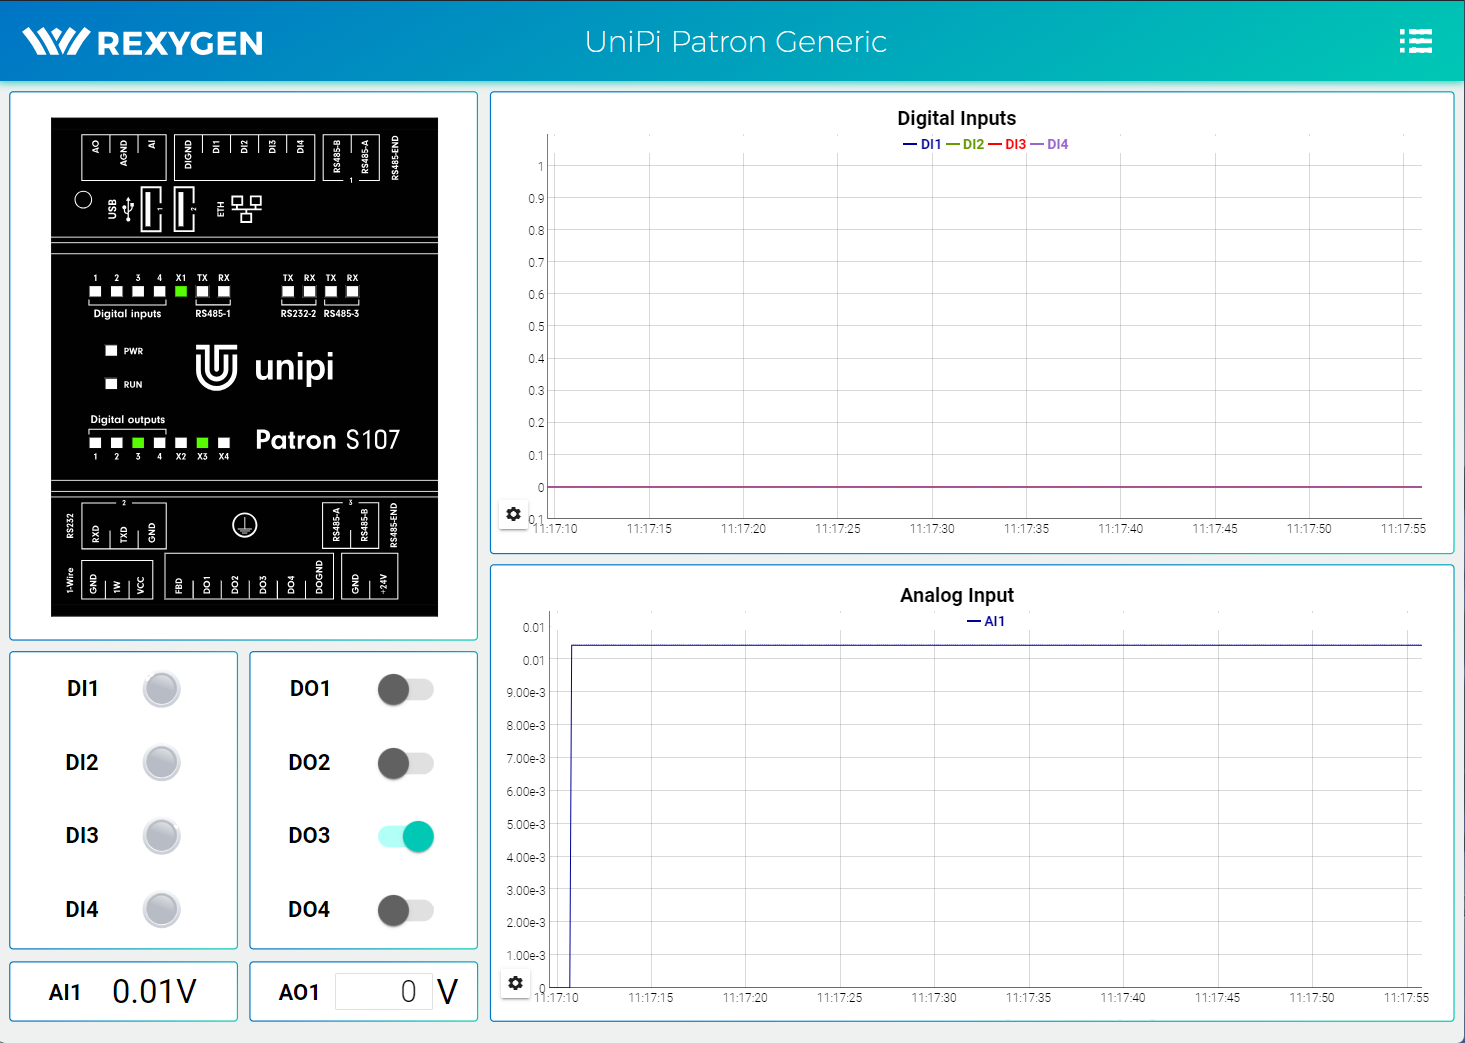
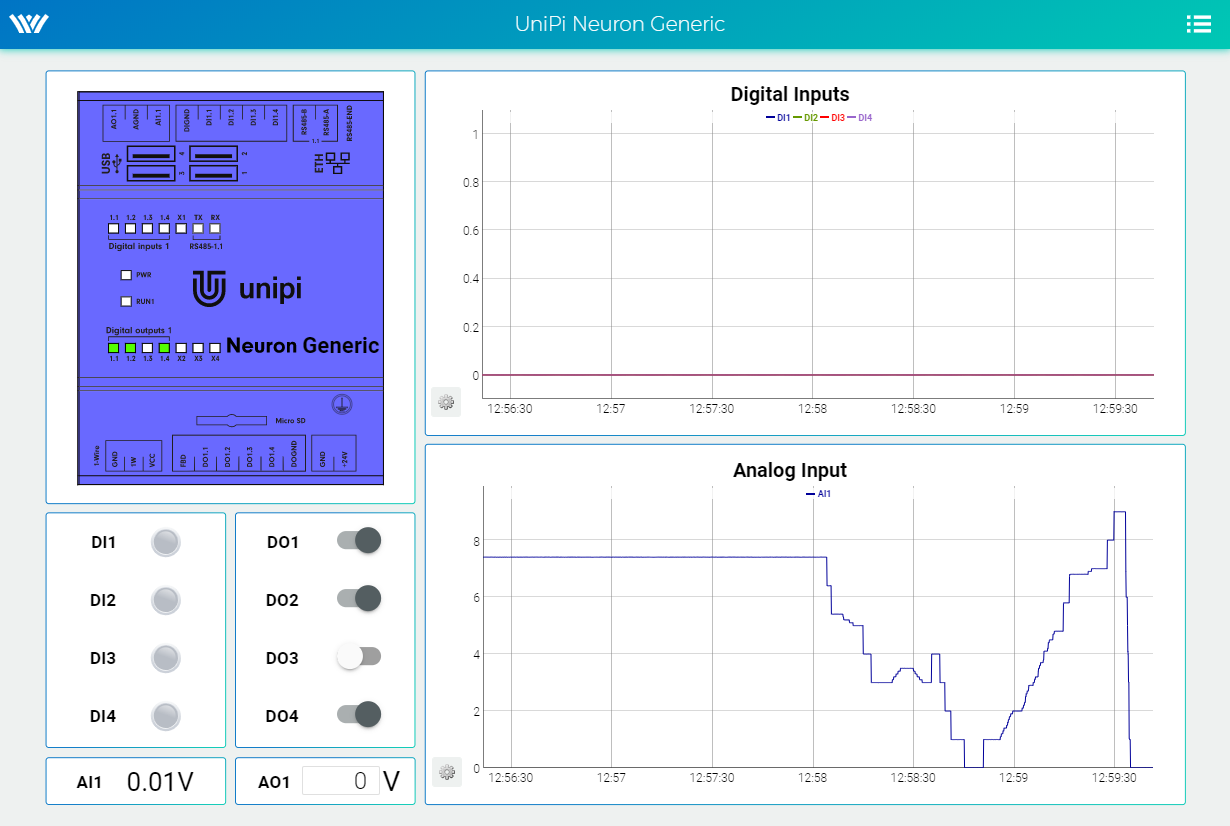
3.2 Control the platform from HMI
The project contains graphical user interface (so-called Human-Machine-Interface) for easy control and observing of general outputs and inputs. The HMI can be found at URL address http://192.168.1.100:8008/hmi/index.html (replace 192.168.1.100 with the IP address of your platform). Use the login: admin, the password is blank. Below you can see, for example, how the HMI of the default project looks sequentially for Monarco HAT, Unipi Patron and Unipi Neuron.

3.3 Control the platform through OPC UA
You can use the OPC UA interface to control your platform too. Install any OPC UA Client
and connect to the OPC UA Server, which is running right now on your platform. There is the
UAExpert software used in this tutorial:
https://www.unified-automation.com/downloads/opc-ua-clients.html.
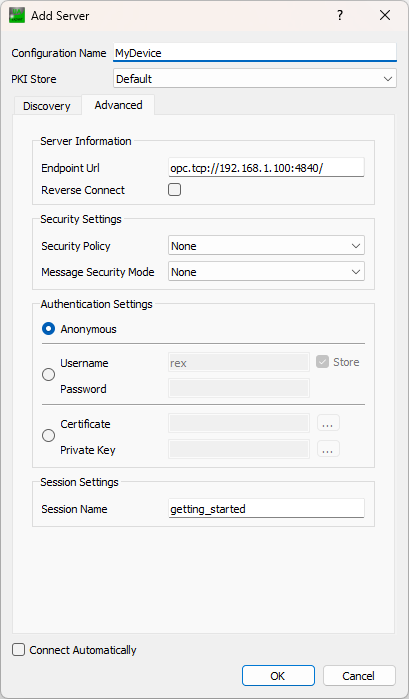
Click on Server in the Menu
Add
Advanced mode and fill the Configuration Name and the Endpoint URL (replace 192.168.1.100
with the IP address of your platform).
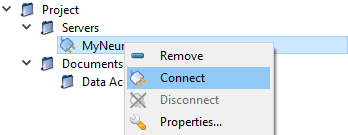
After confirmation (OK), right-click on the new server name in the Project panel and choose Connect.
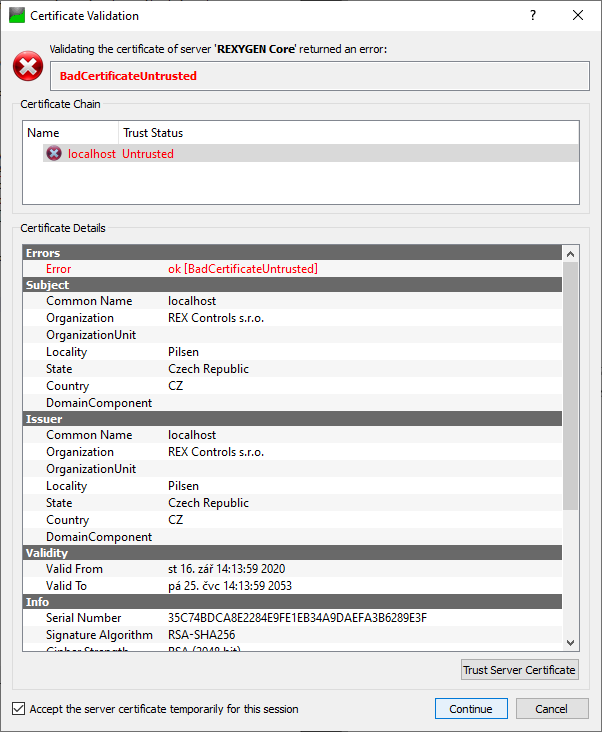
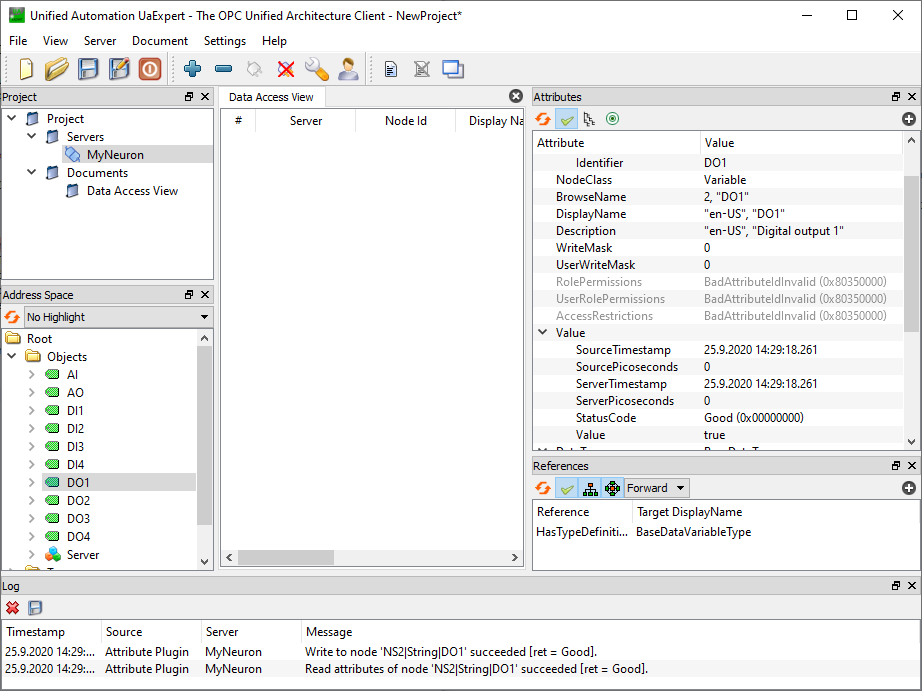
Congratulations, you are now connected to your platform! You can now set the DO1 to value true for example. Navigate to Address Space panel and select DO1. In Attributes panel search Value Value, double-click on it, check the radio box and hit Enter. The first Digital outputs LED diode on the platform should glow. Detailed tutorial on using OPC UA with REXYGEN is there [7].
Bibliography
[1] REX Controls s.r.o.. Function blocks of REXYGEN – reference manual, 2024. .
[2] REX Controls s.r.o.. RexCore (REXYGEN runtime core) Installation, 2024. .
[3] REX Controls s.r.o.. REXYGEN Licensing – User guide, 2024. .
[4] REX Controls s.r.o.. REXYGEN Studio – User manual, 2024. .
[5] REX Controls s.r.o.. First Project, 2024. .
[6] REX Controls s.r.o.. I/O Configuration of Target Platforms, 2024. .
[7] REX Controls s.r.o.. OpcUaDrv driver of REXYGEN – User guide, 2024. .
Documentation reference number: 17159
2025 © REX Controls s.r.o., www.rexygen.com